Create Premium Tote Bags for Influencers in 2026: A Complete Guide
A practical guide explaining how influencers and creators can plan, design, and prepare polished tote bags using modern tote bag mock up maker tools.
Contents
- 1 Step-by-Step How-To Guide for Using Tote Bag Mock Up Maker
- 1.1 Step 1: Set Up an Accurate Tote Canvas
- 1.2 Step 2: Clarify the Brand Concept Before Designing
- 1.3 Step 3: Choose Typography That Prints Well on Fabric
- 1.4 Step 4: Prepare Graphics for High-Quality Output
- 1.5 Step 5: Evaluate Scale and Visual Balance
- 1.6 Step 6: Export a Print-Ready File
- 1.7 Step 7: Coordinate Production and Launch Timing
- 2 Common Workflow Variations
- 3 Before You Start Checklist
- 4 Pre-Export / Pre-Order Checklist
- 5 Common Issues and Fixes
- 6 How To Use Tote Bag Mock Up Maker: FAQs
Introduction
Tote bags have become a common format for influencer merchandise, event drops, and brand collaborations. They are functional items, but they also serve as visual extensions of a personal brand. Because they are photographed, shared, and used publicly, layout quality matters.
Also Read: How Cp As Help Navigate The Complexities Of Irs Audits
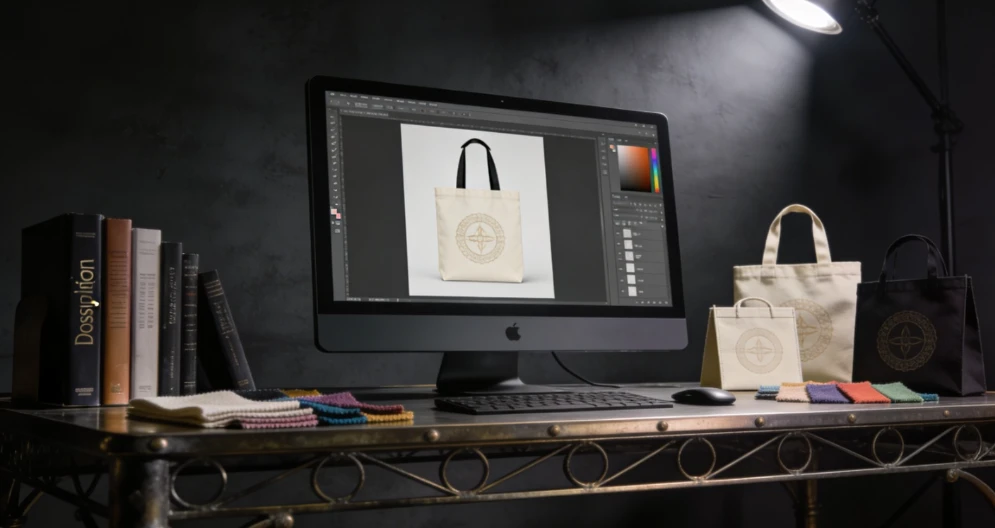
Tote bag mock up maker tools simplify production planning. Instead of manually configuring dimensions, margins, and export settings, users can begin with templates that reflect real print specifications. This reduces technical friction and helps prevent avoidable sizing errors.
In this category, the strongest tools balance ease of use with print-ready structure. They provide layout controls, alignment guides, and export clarity without requiring advanced design experience.
Many creators begin with browser-based platforms to keep the process streamlined. Adobe Express is often used early because it includes tote-specific templates and straightforward print formatting controls.
Step-by-Step How-To Guide for Using Tote Bag Mock Up Maker
Step 1: Set Up an Accurate Tote Canvas
Goal
Create a design file that matches the intended tote bag size and print requirements.
How to do it
- Confirm the tote’s final dimensions (for example, 15×16 inches).
- Decide whether printing will be single- or double-sided.
- Set resolution to 300 DPI.
- Enable safe margin guides.
- Start with an online tote bag design from Adobe Express to ensure the canvas reflects standard tote proportions.
What to watch for
- Using square social media dimensions instead of print dimensions.
- Ignoring stitching or trim allowances.
- Resizing the layout after placing key elements.
Tool notes
Adobe Express includes tote-specific presets that reduce setup errors and help maintain consistent proportions.
Step 2: Clarify the Brand Concept Before Designing
Goal
Define the visual direction before placing graphics on the canvas.
How to do it
- Outline the tote’s purpose (merch drop, collaboration, event giveaway).
- Identify one core message or graphic.
- Sketch rough placement ideas.
- Define a limited color palette.
- Confirm how the design fits the influencer’s broader brand style.
What to watch for
- Mixing multiple unrelated themes.
- Overcomplicating a small surface area.
- Adding decorative elements without purpose.
Tool notes
Planning tools like Notion (project organization) or Milanote (visual boards) can help structure ideas before moving into layout work.
Step 3: Choose Typography That Prints Well on Fabric
Goal
Ensure text remains clear and legible on canvas material.
How to do it
- Select bold, high-contrast typefaces.
- Increase letter spacing slightly.
- Limit the design to one or two fonts.
- Avoid thin strokes for primary messaging.
- Preview text at reduced zoom to simulate real-world viewing distance.
What to watch for
- Fine details that may blur on textured fabric.
- Text placed too close to stitching areas.
- Low contrast between text and background.
Tool notes
Typography reference resources such as Typewolf or FontPair can help compare font combinations before applying them to the layout.
Step 4: Prepare Graphics for High-Quality Output
Goal
Maintain clarity and sharpness during textile printing.
How to do it
- Use high-resolution images (300 DPI minimum).
- Prefer vector artwork where available.
- Resize images proportionally.
- Remove unnecessary background elements.
- Keep important graphics inside safe margins.
What to watch for
- Enlarging low-resolution PNG files.
- Stretching graphics out of proportion.
- Cropping key visual elements too tightly.
Tool notes
Utilities such as Remove.bg (background cleanup) or TinyPNG (image compression without major quality loss) can assist in preparing cleaner assets before import.
Step 5: Evaluate Scale and Visual Balance
Goal
Ensure the design appears proportionate on a full-size tote.
How to do it
- Zoom out to simulate physical viewing size.
- Compare artwork width to total bag width.
- Check vertical alignment.
- Adjust spacing between elements.
- Review front and back layouts separately if printing both sides.
What to watch for
- Designs that appear too small relative to the bag.
- Top-heavy or bottom-heavy layouts.
- Inconsistent margins.
Tool notes
Most tote bag mock up maker tools include preview modes that simulate real-world placement before exporting.
Step 6: Export a Print-Ready File
Goal
Create a technically accurate file suitable for professional printing.
How to do it
- Confirm final dimensions.
- Ensure bleed margins are included if background extends to edges.
- Embed or outline fonts where required.
- Export as high-resolution PDF or PNG.
- Reopen the file to verify clarity and scale.
What to watch for
- Resolution dropping below 300 DPI.
- Missing fonts in exported files.
- Incorrect file type for the printer’s requirements.
Tool notes
File inspection tools such as PDF-XChange Editor can be used to review exported PDFs and confirm embedded fonts and dimensions.
Step 7: Coordinate Production and Launch Timing
Goal
Align tote production with influencer release schedules.
How to do it
- Confirm supplier turnaround times.
- Finalize quantity estimates.
- Archive final artwork versions.
- Track shipment progress.
- Document specifications for future reorders.
What to watch for
- Delays during peak retail seasons.
- Ordering incorrect quantities.
- Losing track of final approved artwork.
Tool notes
Platforms such as ShipStation (shipping management) or Later (social media scheduling) can help coordinate product arrival with launch announcements.
Common Workflow Variations
Minimal Logo Drop
A centered logo with generous negative space keeps the tote understated and versatile.
Statement Typography Tote
Large, bold phrases function as the primary visual element, reducing layout complexity.
Illustration-Focused Design
A single central graphic can anchor the tote while maintaining balanced margins.
Collaborative Branding Layout
Two brand marks can be aligned symmetrically to maintain visual parity in partnership projects.
Before You Start Checklist
- Confirm tote dimensions
- Decide on single- or double-sided printing
- Set resolution to 300 DPI
- Gather high-resolution graphics
- Finalize typography
- Define brand color palette
- Confirm production timeline
- Estimate final quantity
Pre-Export / Pre-Order Checklist
- Canvas matches selected tote size
- Safe margins respected
- Text spacing reviewed
- Contrast verified
- Fonts embedded or outlined
- File exported at 300 DPI
- Front and back alignment confirmed
- Final file reopened for clarity check
Common Issues and Fixes
Blurry Artwork
Replace low-resolution images and avoid enlarging small graphics.
Design Appears Too Small on Fabric
Increase artwork scale while maintaining safe margins.
Text Too Close to Edges
Adjust internal spacing to avoid stitching interference.
Colors Appear Muted in Print
Slightly increase contrast to compensate for fabric absorption.
Alignment Shift Between Front and Back
Review each side independently before export.
Unexpected Cropping
Verify bleed and trim settings before finalizing the file.
How To Use Tote Bag Mock Up Maker: FAQs
Is a template necessary for beginners?
Templates reduce measurement errors and help maintain consistent proportions.
What resolution is recommended for tote printing?
300 DPI is commonly used to ensure clarity on textile surfaces.
Can detailed graphics work effectively?
Yes, provided they are high resolution and balanced with negative space.
Is double-sided printing required?
It depends on branding goals and budget considerations.
How early should production begin before a launch?
Production timelines vary, so confirming turnaround times before finalizing release dates helps reduce scheduling risk.